
Single Minute Exchange of Dies (SMED) is one of the most powerful lean manufacturing tools used to reduce machine changeover time, increase productivity, and improve overall equipment effectiveness (OEE). Many industries such as sheet metal, plastics, injection molding, press shops, die casting, forging, packaging, and CNC machining use SMED to reduce setup time from hours to minutes.
In this article, you will learn the full form of SMED, meaning, the 7 steps of SMED, internal vs external setup, practical shopfloor examples, and how to apply SMED to achieve rapid changeovers.
- What is SMED?
- SMED Full Form
- Why SMED is Important in Manufacturing?
- Internal and External Setup in SMED
- 7 Steps of SMED (Explained with Examples)
- SMED Implementation Procedure (Step-by-Step Guide)
- SMED Example in Manufacturing (Real Shopfloor Case)
- Single Minute Exchange of Dies Formula
- Benefits of SMED
- Challenges in Implementing SMED
- SMED vs General Setup Time Reduction (Difference)
- Conclusion
- Frequently Asked Questions
- F1 Pit Stop Training:
What is SMED?
SMED stands for Single Minute Exchange of Dies, which means reducing the machine setup or die changeover time to single-digit minutes, ideally less than 10 minutes. The primary goal of SMED is to convert long, complex, and waste-filled changeover activities into quick, standardized, and repeatable steps.
In simple words, SMED means:
“How fast can you prepare the next job without stopping production for a long time?”
When the changeover time is reduced:
- Production becomes flexible
- Smaller batches become profitable
- WIP and inventory are reduced
- Machines operate more efficiently
- Customer lead time reduces
This makes SMED a key component of lean manufacturing and continuous improvement.
SMED Full Form
SMED = Single Minute Exchange of Dies
The term was introduced by Shigeo Shingo of the Toyota Production System, who demonstrated that changeovers of more than 2–3 hours could be reduced to less than 10 minutes through analysis and structured steps.
Why SMED is Important in Manufacturing?
Changeover time is one of the biggest sources of production loss. Industries that run multiple part numbers (press shop, injection molding, machining, etc.) lose significant time during setup activities. SMED is important because it helps industries to:
- Reduce machine downtime
- Increase production capacity
- Improve OEE
- Reduce manpower dependency
- Decrease batch size
- Increase flexibility
- Respond quickly to customer demand
- Reduce cost-per-part
In mass manufacturing and automotive industries, SMED is a mandatory part of lean implementation.
Internal and External Setup in SMED
A major concept of SMED is separating setup activities into internal and external steps.
Internal Setup
Activities that can only be done when the machine is stopped.
Examples:
- Removing the old die
- Installing the new die
- Adjusting machine settings
- Connecting hydraulic or pneumatic lines
External Setup
Activities that can be done while the machine is running.
Examples:
- Cleaning the new die
- Preheating or pre-lubricating the die
- Collecting tools, bolts, and clamps
- Preparing raw material
- Pre-setting gauges
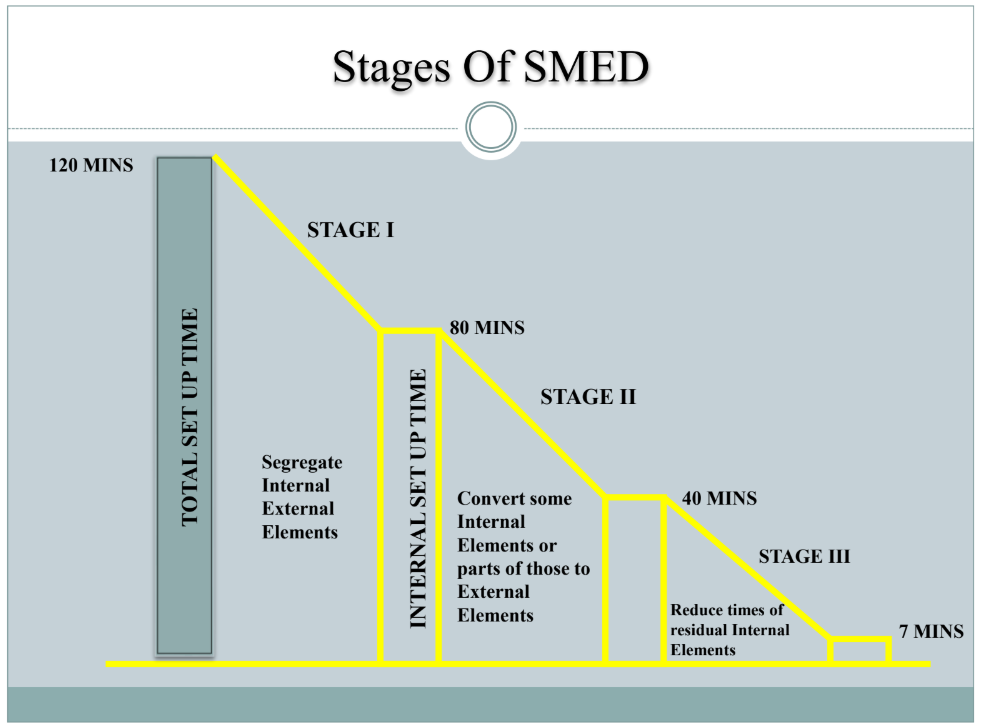
The biggest benefit of SMED comes from:
- Converting internal activities to external
- Streamlining the remaining internal activities
7 Steps of SMED (Explained with Examples)
There are several versions of SMED steps, but the most practical and widely used 7-step format is below. These steps are highly searched and recommended for your article.
1. Observe and document the current changeover
Record the full changeover using video. Write down every action, delay, waiting, and non-value-added step.
Example: In a press shop, the changeover time for a 150-ton press is 2 hours. You record the entire process.
2. Separate internal and external activities
Identify which tasks must be done when the machine is stopped and which can be done earlier.
Example: The new die can be prepared outside the machine while production is still going on.
3. Convert internal setup to external setup
Shift maximum activities to the external stage.
Example: Instead of cleaning and lubricating the die during changeover, perform it beforehand.
4. Streamline internal setup
Reduce internal activities by using:
- Quick clamps
- Standard bolts
- Die lifting tools
- Guide pins
- Hydraulic clamping
Example: Reducing bolt tightening time by using quick-release clamps.
Tools like Poka-Yoke can eliminate adjustment errors during die alignment
5. Streamline external setup
Make external tasks error-free and flow smoothly.
Example: Create a changeover trolley with all tools, gauges, and clamps arranged in sequence.
Organizing tools with 5S ensures faster external setup and reduces searching time
To maintain consistency after SMED implementation, a control plan helps document critical characteristics, checkpoints, and responsible persons
6. Standardize the process
Create:
- SOPs
- Checklists
- Visual guides
- Markings on the machine and dies
Example: Color-coding die handles and clamps to match machine positions.
Changes in setup methods should also be reflected in PFMEA studies to analyze risk after improvement.
7. Train and implement continuous improvement
Train operators and improve the SMED process regularly. Large improvements often come after several cycles.
Example: Reducing changeover time from 2 hours → 45 minutes → 18 minutes in 3 cycles of improvement.
SMED Implementation Procedure (Step-by-Step Guide)
A complete SMED implementation on the shop floor typically includes:
- Select the machine or process with the highest downtime
- Form a cross-functional SMED team
- Record the current changeover with video
- Time-study every step and categorize as internal or external
- Modify setups to convert internal to external
- Redesign tools, clamps, and fixtures
- Reduce adjustments and trials
- Train operators and develop standard work
- Measure improvements (Time before vs Time after)
- Repeat and sustain
SMED Example in Manufacturing (Real Shopfloor Case)
Press Shop Example
A metal stamping company used SMED to reduce die changeover time on a 200-ton press.
Before SMED:
- Changeover time = 1 hour 45 minutes
- The machine is idle for long periods
- Operators searching for spanners, clamps, and bolts
- Die alignment issues
SMED Implementation:
- Prepared the die outside the machine
- Added fixed clamps instead of loose bolts
- Used guide pins for quick alignment
- Created a changeover trolley
- Standardized bolt sizes
After SMED:
- Changeover time = 18 minutes
- Output increased by 20%
- Dramatic improvement in OEE
Injection Molding Example
A plastics company reduced mold change time from 90 minutes to 12 minutes by:
- Pre-heating the mold externally
- Using quick couplers for water lines
- Standardizing mold height
Such real examples increase your ranking because Google prefers practical, experience-based content.
Single Minute Exchange of Dies Formula
There isn’t a single SMED formula, but setup time can be broken down and analyzed using this structure:
Total Setup Time = Internal Setup Time + External Setup Time
For performance metrics, you can also use:
Setup Time Reduction (%) = [(Old Setup Time – New Setup Time) / Old Setup Time] × 100
Goal with SMED:
Reduce internal setup time by converting steps to external and optimizing remaining internal steps.
Benefits of SMED
SMED provides measurable improvements, such as:
- Faster changeovers
- Increased machine availability
- Reduced batch size and inventory
- Improved product flow
- Less operator fatigue
- Reduced rejections and adjustment losses
- Higher OEE and production output
- Better planning and scheduling
A significant increase in OEE is one of the primary results of successful SMED implementation.
SMED helps align production with takt time by reducing long waiting times during changeover
Challenges in Implementing SMED
- Resistance to change
- Lack of training
- No proper SOP for changeover
- Poor tool and die storage
- Frequent adjustments due to non-standard dies
- Machine limitations
With strong leadership and standardized tools, these challenges can be overcome.
SMED vs General Setup Time Reduction (Difference)
SMED is not just about reducing setup time. It is a structured lean method that:
- Uses internal→external conversion
- Uses standardized clamps
- Uses visual management
- Uses continuous improvement
General setup reduction may only focus on speed, not process re-engineering.
Conclusion
SMED is a practical and powerful technique to minimize changeover time and increase manufacturing efficiency. It enables companies to run smaller batches, reduce WIP, improve OEE, and respond faster to customer needs. With the structured approach of observing, analyzing, converting internal to external activities, and using simple mechanical improvements, changeover time can be reduced from hours to minutes.
Every manufacturing industry—automotive, plastic, sheet metal, die casting, and machining—can achieve major benefits by implementing SMED.
Frequently Asked Questions
What is the full form of SMED?
SMED stands for Single Minute Exchange of Dies.
What is the main purpose of SMED?
The main purpose is to reduce machine changeover time to less than 10 minutes, improving productivity and OEE.
What are the 7 steps of SMED?
Observation, separation of internal/external steps, conversion, streamlining, standardization, training, and continuous improvement.
What is an example of SMED?
A press shop reducing die changeover from 2 hours to 18 minutes using quick clamps and preparation trolleys.
What is the difference between an internal and an external setup?
Internal setup requires the machine to be stopped, while external setup can be performed while it is running.
Does SMED work in all industries?
Yes, SMED is used in automotive, plastic, die casting, machining, printing, packaging, and more.
Who introduced SMED?
Shigeo Shingo of the Toyota Production System.
As I web site possessor I believe the content matter here is rattling excellent , appreciate it for your efforts. You should keep it up forever! Best of luck.